

Even if you are new to blockchain or crypto, you must have heard about NFT which is so overwhelming that a great number of mainstream news outlets and celebrities have been chasing the hype.NFT stands for “Non-Fungible Tokens”. In essence, it’s like a unique digital certificate registered in a blockchain, that is used to record the ownership of an asset such as artwork or collectible. This kind of ownership is fulfilled by a free, open standard called “ERC721”. While most tokens are fungible (every token is the same as every other token), ERC-721 tokens are all unique.
If you’re interested in creating an NFT yourself but don’t know how to get started. Then here’s the tutorial for you, step-by-step! In this article, we will walk you through how to create and deploy an NFT (ERC-721) smart contract on the BNB Smart Chain (BSC), using our MegaNode services!
Note: We will use Presets contracts in OpenZeppelin Contracts to create an ERC721 and deploy using Truffle.
Step 1: Connect to the BSC Network
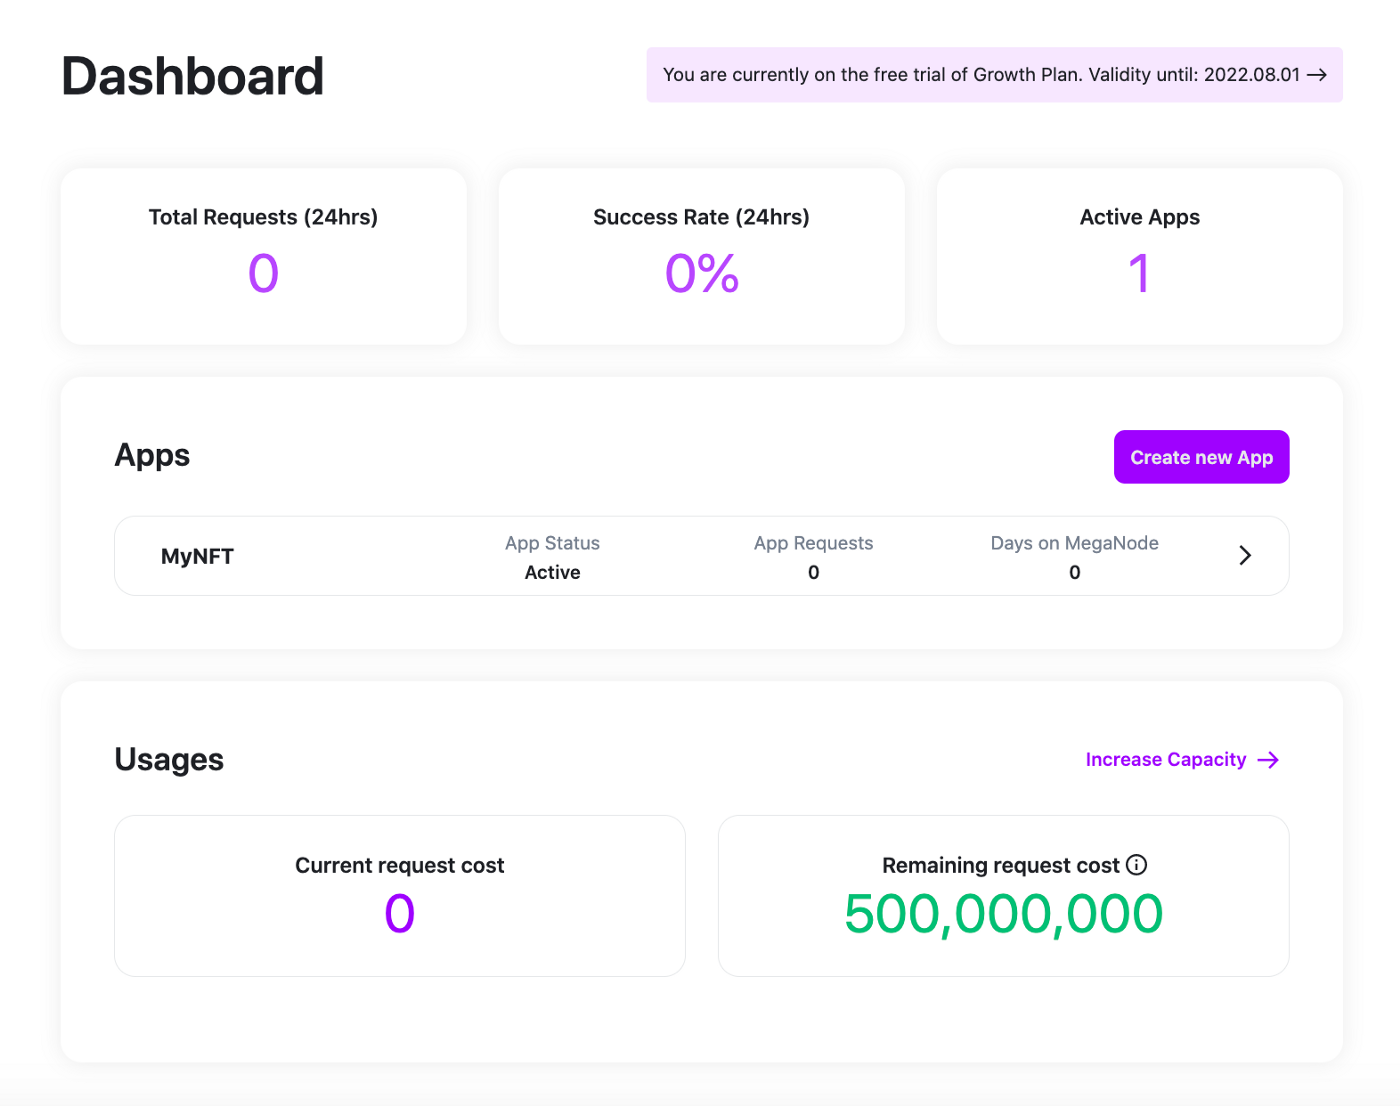
There are a number of ways to initiate requests to the BNB Smart Chain, but in today’s topic, we will demonstrate using FREE account on NodeReal’ MegaNode to communicate with the blockchain network instantly without having to run nodes by yourself. We are currently running an offer of 3-month Growth Plan FREE Trial Campaign, all you need to do is just login with your Github account, and you can test and enjoy our super high-speed performance right away.

Sign up for FREE here if you do not have MegaNode account yet!
Step 2: Create your App (& API key)
Once you’ve created MegaNode account, you can then proceed to create your app and API key. MegaNode currently supports BSC and ETH (both mainnet & testnet). Below are the steps for BSC mainnet :1. Click “Create new App” button in your MegaNode Dashboard.
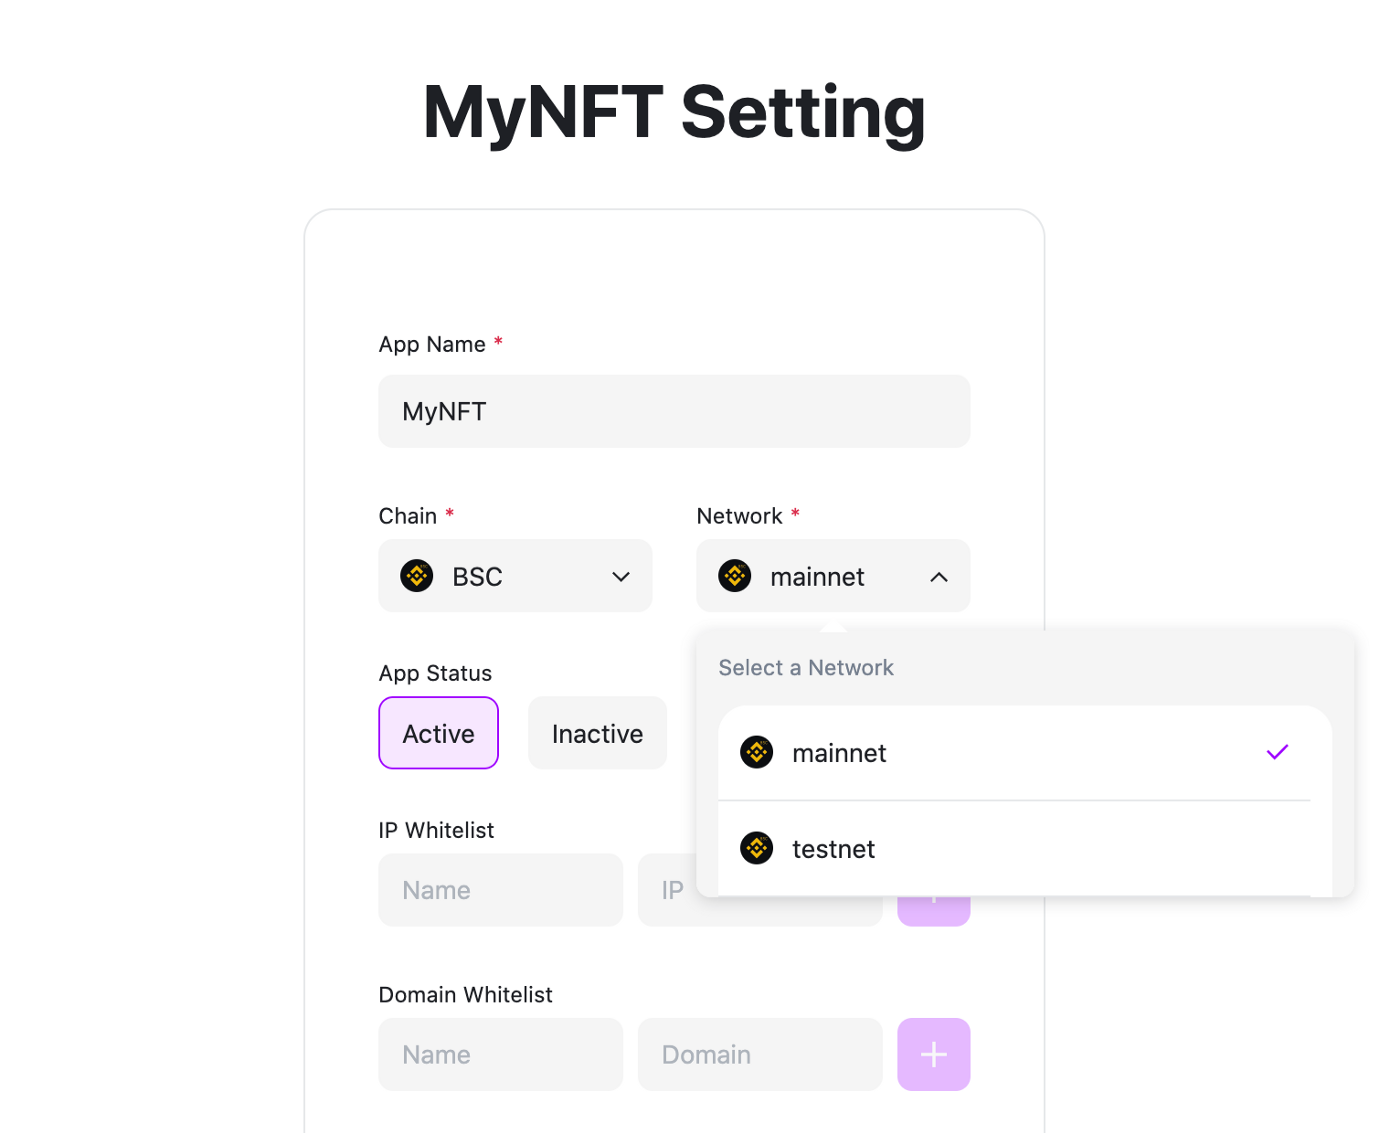
2. Name your app (e.g “MyNFT”), select “BSC” as the chain, and “mainnet” as the network type.
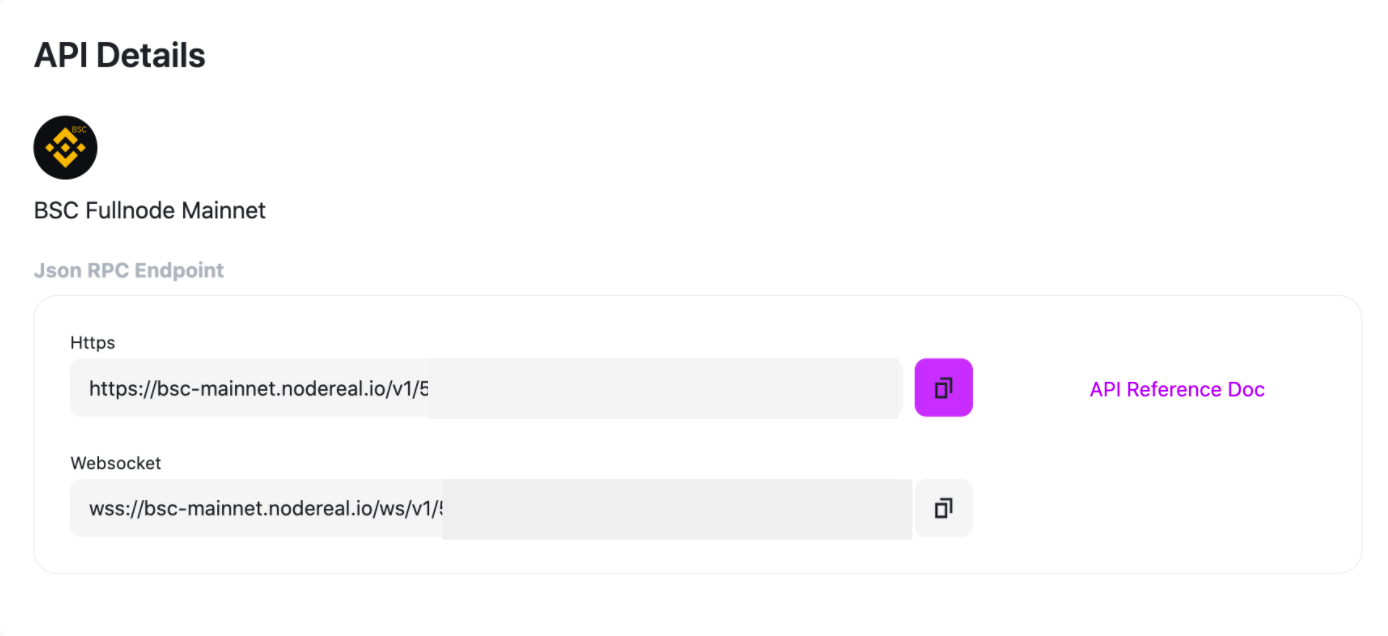
3. That’s it !! You have created your first app in MegaNode successfully!4. Next, scroll down the app page and navigate to the “API Details”. Here you will see JSON RPC Endpoints (API Keys). MegaNode provides both HTTPS and WebSockets access points, which you may customize or configure accordingly to your needs.5. Save your API Key in a separate and secure location. Keep it safe at any point!
6. Do the same with the BSC Testnet from (Step 2–4).
Step 3: Setting up the Environment
Now that is done, we can start coding! Let’s begin by creating a new project.
$ mkdir mynft && cd mynft
$ npm init -y
Then we install OpenZeppelin Contracts which has an implementation of ERC721.
$ npm i --save-dev @openzeppelin/contractsNext up, we will install a development tool for deployment. For this tutorial, let’s use Truffle for example. (You can also use any other tools such as Buidler, Remix, or OpenZeppelin CLI)
$ npm i truffleStep 4: Getting the Contract Artifacts
Hope the steps are clear so far, next we are going to set up our Solidity project using truffle init to create a contracts directory and configuration to connect to a network.
$ npx truffle init
Starting init...
================

> Copying project files to

Init successful, sweet!
Here we will be using Preset [ERC721PresetMinterPauserAutoId](<https://docs.openzeppelin.com/contracts/3.x/api/presets#ERC721PresetMinterPauserAutoId>) which is an ERC721 standard that is preset so it can be minted (with auto token ID and metadata URI), paused, and burned. Since the Preset contracts have already been compiled, we only need to duplicate the artifacts to the build/contracts directory.
$ mkdir -p build/contracts/
$ cp node_modules/@openzeppelin/contracts/build/contracts/* build/contracts/
Using your favourite editor create 2_deploy.js in the migrations directory with the following contents:
// migrations/2_deploy.js
// SPDX-License-Identifier: MIT
const ERC721PresetMinterPauserAutoId = artifacts.require("ERC721PresetMinterPauserAutoId");

module.exports = function(deployer) {
  deployer.deploy(ERC721PresetMinterPauserAutoId, "My NFT","NFT", "<http://my-json-server.typicode.com/huangsuyu/nft/tokens>");
};
Step 5: Deploy to the Public BSC Testnet!
Next, let’s look at deploying on BSC Testnet! Here is a brief guide on how to connect to Public Test Networks with Truffle.You will need the following:
- An Infura project ID, or a public node provider. NodeReal’ MegaNode can be your top choice!
@truffle/hdwallet-providerinstalled- Configure
truffle-config.jsfor the BSC Test network - A funded Testnet account and mnemonic
- A
.secretsor another secret-management solution. Please make sure you don’t commit this to GitHub!
For this part, we will use MegaNode’s JSON RPC Endpoints (API Keys) and thus our truffle-config.js has the following BSC testnet configuration:
testnet: {
      provider: () => new HDWalletProvider(mnemonic, `https://bsc-testnet.nodereal.io/v1/{your-meganode-api-key}`),
      network_id: 97,
      confirmations: 10,
      timeoutBlocks: 200,
      skipDryRun: true
    },
    bsc: {
      provider: () => new HDWalletProvider(mnemonic, `https://bsc-mainnet.nodereal.io/v1/{your-meganode-api-key}`),
      network_id: 56,
      confirmations: 10,
      timeoutBlocks: 200,
      skipDryRun: true
    },
Note: Please replace “your-meganode-api-key” with the keys you just saved in step 2.
Deploy to BSC Testnet
$ npx truffle migrate --network testnet
Compiling your contracts...
===========================
> Everything is up to date, there is nothing to compile.
Starting migrations...
======================
> Network name:    'testnet'
> Network id:      97
> Block gas limit: 29999542 (0x1c9c1b6)
1_initial_migration.js
======================
   Deploying 'Migrations'
   ----------------------
   > transaction hash:    0x242238adcbb068a094063b95980e5ee60c5121d4882ff972d45582c7c5ff3301
   > Blocks: 4            Seconds: 9
   > contract address:    0xd691C3c0BA3851C4416DbC159bFCfFE944D9bF8c
   > block number:        18409839
   > block timestamp:     1649843598
   > account:             0x0eC28ba1DE728F7B19a90326874FF03F8239aF13
   > balance:             4.99751146
   > gas used:            248854 (0x3cc16)
   > gas price:           10 gwei
   > value sent:          0 ETH
   > total cost:          0.00248854 ETH
   Pausing for 10 confirmations...
   --------------------------------
   > confirmation number: 2 (block: 18409842)
   > confirmation number: 3 (block: 18409843)
   > confirmation number: 5 (block: 18409845)
   > confirmation number: 6 (block: 18409846)
   > confirmation number: 7 (block: 18409847)
   > confirmation number: 9 (block: 18409849)
   > confirmation number: 10 (block: 18409850)
   > Saving migration to chain.
   > Saving artifacts
   -------------------------------------
   > Total cost:          0.00248854 ETH
2_deploy.js
===========
   Deploying 'ERC721PresetMinterPauserAutoId'
   ------------------------------------------
   > transaction hash:    0xbd39bbf09f68ed3ac6b713c34e4d2b022bc1816247c185465c4238bff92993d0
   > Blocks: 3            Seconds: 9
   > contract address:    0x2778D628e77Fd9b3E5aD4069356996829539c561
   > block number:        18409860
   > block timestamp:     1649843661
   > account:             0x0eC28ba1DE728F7B19a90326874FF03F8239aF13
   > balance:             4.9717969
   > gas used:            2528943 (0x2696af)
   > gas price:           10 gwei
   > value sent:          0 ETH
   > total cost:          0.02528943 ETH
   Pausing for 10 confirmations...
   --------------------------------
   > confirmation number: 2 (block: 18409863)
   > confirmation number: 3 (block: 18409864)
   > confirmation number: 5 (block: 18409866)
   > confirmation number: 6 (block: 18409867)
   > confirmation number: 7 (block: 18409868)
   > confirmation number: 9 (block: 18409870)
   > confirmation number: 10 (block: 18409871)
   > Saving migration to chain.
   > Saving artifacts
   -------------------------------------
   > Total cost:          0.02528943 ETH
Summary
=======
> Total deployments:   2
> Final cost:          0.02777797 ETH
Mint
We can now send a transaction to mint tokens to a given account, from an account with the minter role.
npx truffle console --network testnet
truffle(testnet)> nft = await ERC721PresetMinterPauserAutoId.deployed()
In this case, we are minting from the account which deployed the token, which is given the minter role.To see configured accounts run the command accounts.
truffle(testnet)> accounts[ '0x133d144f52705ceb3f5801b63b9ebccf4102f5ed',We will mint 1 NFT with token ID 0. Specify the address that you want to be the token holder (0x133d144f52705ceb3f5801b63b9ebccf4102f5ed is one of my test accounts)
truffle(testnet)> await nft.mint("0x133d144f52705ceb3f5801b63b9ebccf4102f5ed")undefinedtruffle(testnet)> { tx: '0xc81157f25dbd120e9742669c3d6f20268a5ea8d8fd0086a49f06ace1f70f952c', receipt: { blockNumber: 18409961, gasUsed: 115701, logs: [ [Object] ], to: '0x2778d628e77fd9b3e5ad4069356996829539c561', transactionHash: '0xc81157f25dbd120e9742669c3d6f20268a5ea8d8fd0086a49f06ace1f70f952c', type: '0x0', blockHash: '0x7f45a31e875dcc46513fba39f6d47c1f99b8a8d28b4b0cfd358a319d1cf84b50', cumulativeGasUsed: 5773638, from: '0x0ec28ba1de728f7b19a90326874ff03f8239af13', logsBloom: '0x00000000000000000000000000000000000000000000000000000000000000000000000000000000000000000000000000000000000000000000000000000000000000000000000000000008000000000000000000000000000000000002000000000000020000000000000000000800000000000000000000000010000000000000000000000000000000000000000000000000000000000000000000000000000000000000000000000000000000000000000000000000000000200000000000000002000000000000000000000000000000000000000000000000001020000001000000000000000000000000000000000000000000000000000000100000', status: true, ....🎉 With all the above done, you should have just deployed your first NFT smart contract to the BNB Smart Chain successfully!!! 🎉Continue your NFT journey and keep building with #NodeReal #MegaNode!